Happy Raksha Bandhana to all.................
Friday, 21 August 2015
Friday, 5 June 2015
My CG Project
Chapter 1
INTRODUCTION
This
project demonstrate the movement of a 3D truck. The object can be moved forward
and backward using keyboard interface. It also uses mouse function to rotate
the truck in order to view the truck from all directions.
The
viewing concepts are applied to the truck so that we can see the object with
different viewing angles. The viewing angles can be changed during the runtime
using keyboard keys. The
main intention is viewing the objects in user convenient angles. There is a
menu attached to the right button of mouse that shows further options to modify
the scene.
OpenGL provides user interaction. This project has mouse
interactions, keyboard interaction and menu which provides set of options. In
the program it is implemented such that whenever the specified key in the
keyboard is pressed, the viewing position of the viewer will be moved.
Chapter 2
LITERATURE
SURVEY
OpenGL (Open Graphics Library)
is a standard specification defining a cross-language, cross-platform
API for writing
applications that produce 2D and 3D computer graphics. The interface
consists of over 250 different function calls which can be used to draw complex
three-dimensional scenes from simple primitives.
Many OpenGl functions are used for
rendering and transformation purposes. Transformations functions like glRotate
(), glTranslate (), glScaled () can be used.
OpenGL provides a powerful but
primitive set of rendering command, and all higher-level drawing must be done
in terms of these commands. There are several libraries that allow us to
simplify your programming tasks, including the following:
OpenGL Utility Library (GLU) contains
several routines that use lower-level OpenGL commands to perform such tasks as
setting up matrices for specific viewing orientations and projections and
rendering surfaces.
OpenGL Utility Toolkit (GLUT) is a
window-system-independent toolkit, written by Mark Kill guard, to hide the
complexities of differing window APIs.
To achieve the objective of the project, we
require drawing 3D objects and applying transformations to that objects. The 3D
graphics implementation in OpenGl is better solution for this.
2.1 Computer Graphics
Graphics
provides one of the most natural means of communicating with a computer, since
our highly developed 2D Or 3D pattern-recognition abilities allow us to
perceive and process pictorial data rapidly. Computers have become a powerful
medium for the rapid and economical production of pictures. Graphics provide a
so natural means of communicating with the computer that they have become
widespread.
Interactive graphics is the most important
means of producing pictures since the invention of photography and television.
We can make pictures of not only the real world objects but also of abstract
objects such as mathematical surfaces on 4D and of data that have no inherent
geometry.
A computer graphics system is a computer system
with all the components of the general purpose computer system. There are five
major elements in system: input devices, processor, memory, frame buffer,
output devices.
2.2 OpenGL
OpenGL
is the premier environment for developing portable, interactive 2D and 3D
graphics applications. Since its introduction in 1992, OpenGL has become the
industry's most widely used and supported 2D and 3D graphics application
programming interface (API), bringing thousands of applications to a wide variety
of computer platforms.
OpenGL fosters innovation and speeds
application development by incorporating a broad set of rendering, texture
mapping, special effects, and other powerful visualization functions.
Developers can leverage the power of OpenGL across all popular desktop and
workstation platforms, ensuring wide application deployment.
OpenGL Available Everywhere: Supported on all UNIX® workstations, and
shipped standard with every Windows 95/98/2000/NT and MacOS PC, no other
graphics API operates on a wider range of hardware platforms and software
environments.
OpenGL runs on every major operating
system including Mac OS, OS/2, UNIX, Windows 95/98, Windows 2000, Windows NT,
Linux, Open Step, and BeOS; it also works with every major windowing system,
including Win32, MacOS, Presentation Manager, and X-Window System. OpenGL is
callable from Ada, C, C++, Fortran, Python, Perl and Java and offers complete
independence from network protocols and topologies.
2.2.1.The OpenGL interface
Most of our
application will be designed to access OpenGL directly through functions in
three libraries. Functions in the main GL (or OpenGL in windows) library have
names that begin with the letters gl and are stored in a library usually
referred to as GL (or OpenGL in windows).
The
second is the OpenGL Utility Library
(GLU). This library uses only GL functions but contains code for creating
common objects and simplifying viewing. All functions in GLU can be created
from the core GL library but application programmers prefer not to write the
code repeatedly. The GLU library is available in all OpenGL implementations;
functions in the GLU library begin with letters glu.
To
interface with the window system and to get input from external devices into
our programs, we need at least one more system-specific library that provides
the “glue” between the window system and OpenGL. For the X window system, this
library is functionality that should be expected in any modern windowing
system.
Fig
2.1 shows the organization of the libraries for an X Window System environment.
For this window system, GLUT will use GLX and the X libraries. The application
program, however, can use only GLUT functions and thus can be recompiled with
the GLUT library for other window systems.
OpenGL application Program
|
GLU
|
GL
|
GLUT
|
GLX
|
Xlib, Xtk
|
Frame Buffer
|
Fig 2.1 Library organization
Chapter 3
SYSTEM REQUIREMENTS SPECIFICATION
3.1 Purpose
Purpose
of this project is to learn and understand computer graphics using opengl and
to implement opengl functions. The aim is to simulate the truck movements.
3.2 Scope
The
scope of the project is to portray a 3D environment that provides the user with
the example of various basic transformations and viewing techniques available
in OpenGL. It provides most of the features that a 3-D graphics editor should
have. It is developed in C.
3.3 Functional Requirements
·
mouse();
·
glTranslate();
·
glRotate();
·
glScale();
·
keys();
·
menu();
·
main();
·
display();
·
reshape();
3.4 Non Functional Requirements
3.4.1 Hardware Requirements
Minimum
hardware specification
§ Microprocessor: 1.0 GHz and above CPU based on either AMD or INTEL
Microprocessor Architecture
§ Main memory : 512 MB RAM
§ Hard Disk : 40 GB
§ Hard disk speed in RPM:5400 RPM
§ Keyboard: QWERTY Keyboard
§ Mouse :2 or 3 Button mouse
§ Monitor : 1024 x 768 display resolution
3.4.2 Software Requirements
Minimum
software specification
§ Operating system : Windows
or Linux
§ OPENGL Library/GLUT
§ Mouse Driver
§ Graphics Driver
§ C Language
Chapter 4
DESIGN
The project
“Truck Simulation” provides the 3D view of truck on the computer window. The
truck can be moved forward and backward using keyboard interface. Also we can
change the viewing angles in all x, y and z direction using keyboard keys.
The viewing
window can be reshaped into any aspect ratio and the objects are still visible.
To view the object effectively the perspective viewing is added.
Mouse is use
to rotate the object with respect to y-axis. Also a menu is attached which
consists of many options that can be manipulate the scene. A beautiful
background is provided to increase the quality of the scene.
The flow of
control in the program is given in the figure 4.1. In the main function we have
four callback functions and one function to create menu. A callback is a piece of executable
code that is passed as an argument to other code, which is expected
to call back (execute) the
argument at some convenient time. The invocation may be immediate as in a synchronous callback, or it might
happen at later time as in an asynchronous
callback. The main program calls library function, which then calls the
callback function whenever required in the program.
The reshape function is used to reshape the
window whenever the aspect ratio of the window is changed by the user. The
display function is called in order to display the object on the window.
Keyboard and Mouse functions are used to implement the interactions with
keyboard and mouse respectively.
START
|
MAIN( )
|
DISPLAY( )
|
MOUSE( )
|
KEYBOARD( )
|
LEFT BUTTON
|
RIGHT BUTTONON
|
MOVE TRUCK
|
CHANGE
VIEWING
ANGLES
|
MENU
|
ROTATE
|
STOP
|
RESHAPE( )
|
TRUCK()
|
VIEWPORT
|
Fig 4.1 Design Diagram
4.1 Functions
4.1.1
glPushMatrix, glPopMatrix Function
The
glPushMatrix and glPopMatrix functions push and pop the current matrix stack.
4.1.2 glBegin, glEnd Function
The
glBegin and glEnd functions delimit the vertices of a primitive or a group of
like primitives. The primitive or primitives
that will be created from vertices presented between glBegin and the subsequent
glEnd.
4.1.3 Transformation Functions
·
glTranslate Function
The
glTranslated and glTranslatef functions multiply the current matrix by a
translation matrix.
·
glRotatee Function
The
glRotated and glRotatef functions multiply the current matrix by a rotatiotion
matrix. This will rotate the given object by an angle with respect to given
reference axis.
4.1.4
glMatrixMode Function
The
glMatrixMode function specifies which matrix is the current matrix.The matrix
stack that is the target for subsequent matrix operations.
4.1.5
glLoadIdentity Function
The
glLoadIdentity function replaces the current matrix with the identity matrix.
4.1.6 glOrtho
This
function defines perspective viewing volume with all parameters measured from
the centre of projection.
4.1.7 Callback functions
·
glutDisplayFunc Function
glutDisplayFunc sets the display
callback for the current window.
·
glutReshapeFunc Function
glutReshapeFunc
sets the reshape callback for the current window.
·
glutKeyboardFunc
Function
Registers the keyboard callback function func.
The callback function returns the ASCII code of the key pressed and the
position of the mouse.
·
5.1.7.4
glutMousefunc Function
Registers the mouse callback function func. The
callback function returns the button (GLUT_LEFT_BUTTON, GLUT_RIGHT_BUTTON, GLUT_MIDDLE_BUTTON),
the state of the button after the event (GLUT_UP, GLUT_DOWN) and the position
of the mouse with respect to the top left corner of the window.
·
glutcreateMenu
Function
glutCreateMenu creates a new pop-up menu and
returns a unique small integer identifier.
·
glutAddMenuEntry
Function
This function adds an entry with the string
name displayed to the current menu. Value is returned to the menu callback when
the entry is selected
4.1.8 glutInit
Function
glutInit
is used to initialize the GLUT library.
4.1.9
glutInitDisplayMode Function
glutInitDisplayMode
sets the initial display mode.Display mode, normally the bitwise OR-ing of GLUT
display mode bit masks. GLUT_RGB is an alias for GLUT_RGBA. GLUT_DOUBLE is bit
mask to select a double buffered window. This overrides GLUT_SINGLE.
GLUT_DEPTH bit
mask to select a window with a depth buffer.
4.1.10
glutMainLoop Function
glutMainLoop
enters the GLUT event processing loop.
Chapter 5
IMPLEMENTATION
We
used the C programming language to implement the truck simulation. The truck is
built using opengl primitives and with the help of many user defined function
available in opengl library. We used the function truck for the creation of
object.
5.1 Implementation of
main, reshape and display functions
5.1.1 main function
The viewing window is created in
opengl using the function glutCreatewindow( ).But before creating a window we
have to initialize other things like display mode, window position and window
size. A 3D window of size 1000x1000 at position (0, 0) which uses RGB color
model and includes double buffering can be created using the code snippet given
below.
glutInitDisplayMode(GLUT_DOUBLE|GLUT_RGB|GLUT_DEPTH);
glutInitWindowSize(1000,1000);
glutInitWindowPosition(0.0,0.0);
glutCreateWindow("Truck
Simulation");
5.1.2 reshape function
The window which is created using
glutCreateWindow( ) is having the size
1000x1000 as specified in the glutInitWindowPosition( ) function .But an
interactive program should provide an option to change the window size during
runtime. The reshape function is used to redraw all objects whenever the aspect
ratio of the window is changed. It is
called using callback function glutReshapeFunc( reshape). Whenever a window
that is reshaped to a width of ‘w’ and height of ‘h’ the codes shown below is used to redraw the
objects inside the window.
glViewport(0,0,w,h);
glMatrixMode(GL_PROJECTION);
glLoadIdentity();
if(w<=h)
glFrustum(-2.0,2.0,-2.0*(GLfloat)h/(GLfloat)w,2.0*(GLfloat)h/(GLfloat)w,2.0,20.0);
else
glFrustum(-2.0,2.0,-2.0*(GLfloat)w/(GLfloat)h,2.0*(GLfloat)w/(GLfloat)h,2.0,20.0);
glMatrixMode(GL_MODELVIEW);
The above code create a window using
changed height and width parameters. Here the glFrustum is used to include
perspective viewing .
5.1.3 display function
The display
function is used to draw the actual object. It is called using callback
function glutDisplayFunc(display ). In this function we have to clear the color
buffer bit and depth buffer bit before drawing anything. The gluLookAt( )
function is used to set the viewing position. Here we created separate
functions to draw the background and truck that should be called in the display
function. Before drawing the truck we have to apply suitable transformation
functions to display the truck at required position. This can be implemented
using the block of codes given below.
glClear(GL_COLOR_BUFFER_BIT|GL_DEPTH_BUFFER_BIT);
glLoadIdentity();
glPushMatrix();
gluLookAt(viewer[0],viewer[1],viewer[2],0.0,0.0,0.0,0.0,1.0,0.0);
background();
glRotatef(theta[0],0.0,1.0,0.0);
glRotatef(theta[1],1.0,0.0,0.0);
glTranslatef(0,0,tx);
glScalef(1.0,1.4,1.0);
truck();
glPopMatrix();
glFlush();
glutSwapBuffers();
The background function is used to
draw background. The truck ( ) function
call is used to draw the object truck that is implementer in the truck
function.
5.2 Implementation of Mouse and Keyboard functions
5.2.1 mouse function
Mouse
function is used to control the operations in the program, like motion of the plane,
object and selecting menu options. Sample function is as shown below,
mouse(int btn,int state,int
x,int y)
For menu attachment,
glutAttachMenu(GLUT_RIGHT_BUTTON);
Inside the
mouse function we are increasing the rotation angle that is used to rotate the
object. Whenever glutPostRedisplay( ) is called the object is redrawn using
changed values. The mouse function is implemented using the code shown below .
if(btn==GLUT_LEFT_BUTTON
&& state==GLUT_DOWN)theta[0]+=10.0;
if(theta[0]>360.0)
theta[0]-=360.0;
glutPostRedisplay();
Where theta
is the rotation angle of the object.
5.2.2 keyboard function
Keyboard function is used to control the operation in
the program like camera movements. Sample function for keyboard is given below.
void
keyboard(unsigned char key, int x,int y)
Inside the
keyboard function we have to change the viewing angles and we have to increase
the translation distance of the object in order to move the truck forward and
backward.
Here we used
the alphabets x, y and z to increase and decrease the viewing angles. The tx is
the translation distance that is increased when user press key ‘d’ and
decreases when user presses ‘a’. Whenever user presses key ‘r’ all values
should reset to initial values so that object is placed at the default
position. This is implementer using the code snippet shown below.
if(key=='x') if(viewer[0]>-4)viewer[0]-=1.0;
if(key=='X') if(viewer[0]<4)viewer[0]+=1.0;
if(key=='y') if(viewer[1]>-2)viewer[1]-=1.0;
if(key=='Y') if(viewer[1]<2)viewer[1]+=1.0;
if(key=='z') if(viewer[2]>3.0)viewer[2]-=1.0;
if(key=='Z') if(viewer[2]<9.0)viewer[2]+=1.0;
if(key=='d')
tx+=0.5;
if(key=='a')
tx-=0.5;
if(key=='r')
{viewer[0]=0;viewer[1]=1.1;viewer[2]=7.0;tx=1.0;theta[0]=80;}
glutPostRedisplay();
Where viewer[0], viewer[1],
viewer[2] are the viewing angles with respect to x, y and z axis respectively.
‘tx’ is the translation distance, used to move the truck forward and backward.
5.3 Implementation of truck and background functions
The truck is created using truck
function, which uses other functions to draw smaller components of the truck.
5.3.1 Circle
This function is used to draw the
circle that is used while drawing the tires of the truck. In this function to
draw circle the vertices any one of 1/8 th part of the circle is found using
equation of the circle. All other 7 vertices are reflection of this vertex in
different place.
GLfloat x,y;
glBegin(GL_POINTS);
for(x=-r;x<=(r*(1/sqrt(2)));x+=0.0001){
y=sqrt((r*r)-(x*x));
glVertex3f(x,y,z);
glVertex3f(y,x,z);
glVertex3f(-x,y,z);
glVertex3f(-y,x,z);
glVertex3f(x,-y,z);
glVertex3f(y,-x,z);
glVertex3f(-x,-y,z);
glVertex3f(-x,-y,z);
}
glEnd();
5.3.2 Tyre
This is used to draw a single tyre
of the truck. Here we are called the circle function continuously inside the
for loop to fill the tyre with required color. This can be done by using the
codes shown below.
To fill the tyre by increasing the
radius of the circles everytime.
for(r=0.15;r<=0.4;r+=0.01){
circle(r,0);
circle(r,0.25);}
To add thickness to the tyre we can
draw circle continuously by increasing the z index value as shown below.
for(z=0;z<=0.25;z+=0.01){
circle(0.15,z);
circle(0.4,z);
}
5.3.3 Wheels
This function is used to combine all
four tyres of the truck. Before calling the tyre() function the circle is
positioned in correct place using transformation functions.
This can be implemented using the
algorithm shown below. First bring the tyre to require position and then draw
the tyre. This is repeated four times to draw four tyres.
glPushMatrix();
glTranslatef(1.3,0.0,2);
glRotatef(90.0,0.0,1.0,0.0);
tyre();
glPopMatrix();
Similar way
remaining three are drawn.
5.3.4 Polygon
This function is used to draw a
single filled square is used to draw a 3D cube. All four coordinate positions
are passed as arguments to the function. Here GL_POLYGON is used to draw a
filled polygon with four vertices specified in between glBegin and glEnd.
glBegin(GL_POLYGON);
glVertex3fv(vertices[a]);//first
vertex
glVertex3fv(vertices[b]); //second
vertex
glVertex3fv(vertices[c]); //third
vertex
glVertex3fv(vertices[d]); //fourth
vertex
glEnd();
Where a, b, c, d are considered as
four vertices of the polygon. They are index to the multidimensional array called
‘vertices’ where the actual vertex values are stored.
5.3.5 Color cube
This
function is used to draw a 3D cube using polygon function discussed above. All
six faces are drawn using appropriate colors by calling polygon function six
times. First set the color of one phase and the call the polygon function
declared before. This can be implemented by repeating the below step six times
with different parameters.
glColor3fv(colors[c1]);//Set the
color
polygon(2,3,7,6); //call the polygon
function
5.3.6 Wall
This
function is used to resize the cube drawn above to form a wall like structure
that is used to build the sides of the truck. The cube is scaled using
thickness that is passed to the function as parameter.
glPushMatrix();
glTranslated(0.5,0.5*thickness,0.5);
glScaled(0.8,thickness,1.0);
colorcube();
glPopMatrix();
5.3.7 Body
This
function create the main body for the truck. Using the wall function defined
above and openGL transformation functions trucks body is created. Here we
applied the required transformation to the wall before calling the wall
function. We have to call wall function
eight times to draw the carrier and six times to draw the cabin part. To call
the wall we are using the format as shown below.
Set the colors ;
glPushMatrix();
glScalef(1.0,1.0,1.2);//Scale to
required size
glTranslatef(0.0,0.0,-0.28);//Translate
to required position
wall(0.08);//Call wall function
glPopMatrix();
This will draw a single wall. But we
have to repeat this procedure to draw the entire truck by calling wall function
after adjusting the position.
5.3.8 Truck
The
truck object is created by combining wheel and body and wall functions.This
function is
simple because here we are only calling the sub functions to draw the entire
truck. This function is called in the display function. This consist of
following function calls.
body();
wall(0.04);
wheels();
5.3.9 background function
This function is used to draw
background for the scene. The background is create by simply drawing rectangles filled with required appropriate colors.
The road is also drawn using rectangle function. Also we added white lines in
the road .
glBegin(GL_QUADS);
Vertices for back side rectangle;
Vertices of the road;
Vertices to draw white lines in
road;
glEnd( );
5.4 Implementation of menu
Menu are
provided to interact with the user. The menu is created using glutCreateMenu( )
function and entries are added to it using
glutAddMenuEntry( ) function .We are provided different options to the
user to manipulate the scene. The menu includes options to change the
backgroung color, change the background of the scene, change the color of the
road, reset all settings and to exit the program. The right button of the mouse
is attached to the menu using glutAttachMenu(GLUT_RIGHT_BUTTON) function.
Inside the menu function the operations can be implemented using the code shown
below.
switch(id) {
case
1 :change the background using glClearColor( );
case
2 :Reset all values to initial values;
case
3 :Change the road color;;
case
4 :exit(0);
}
Chapter 6
FUTURE ENHANCEMENTS
The Additional features
that are planned to be supported in the future includes well designed
background, Additional decorations to the truck. Also we are planned to add
sound feature. We are also trying faster and smooth movement of the truck
without any delay.
We also planned to add
other vehicles to the project. In the background buildings are added using
images from external features. We planned
to improve user interactions.
Chapter 7
CONCLUSION
We found designing and
developing this 3D Truck as a very interesting and learning experience. It
helped us to learn and understand computer graphics, design of Graphical User
Interfaces, interface to the user, user interaction handling and screen
management. We also learned how to interact with various devices such as mouse,
keyboard etc. This project helps us to understand many of the opengl functions
that are available in graphics library.
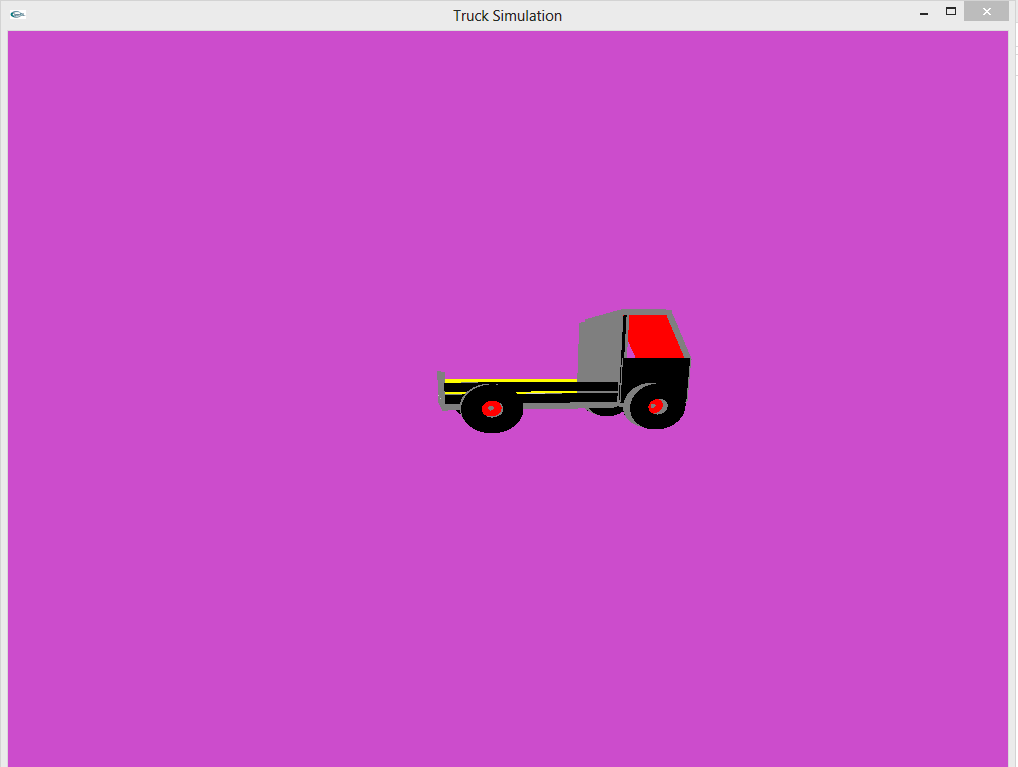
Chapter 8
SNAPSHOTS
.


REFERENCES
Text
books
[1]
Interactive Computer Graphics A Top-Down
Approach with OpenGL Edward Angel-2nd Edition, Addison-Wesley, 2000.
[2]
Computer Graphics Using OpenGL
F.S
Hill, Jr. -2nd Edition, Pearson education, 2001
[3]
Computer Graphics
James D Foley, Andries Van Dam, Steven K
Feiner, John F Hughes, Addison Wesley 1997
Websites
[1] www.openGL.org
Subscribe to:
Comments (Atom)